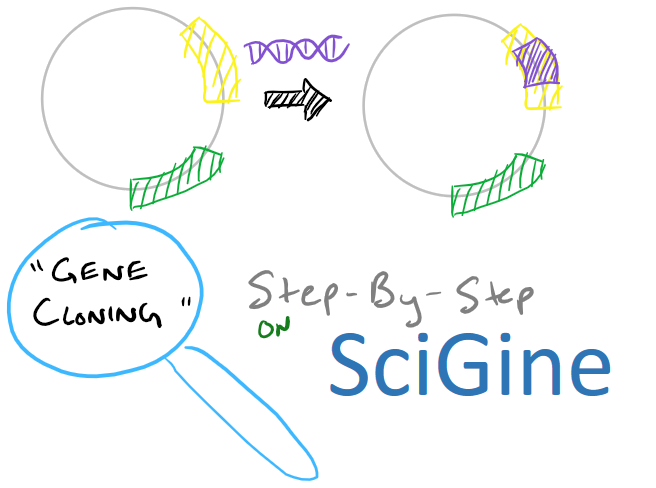
Gene Cloning with Plasmids: Summary
We all know that DNA is the basic building block of biology. So, how can we make use of DNA to change cell biology? Well, today’s blog post will focus on “gene cloning” — making plasmids (circular DNA strands) so that we can introduce them into bacteria using our previous bacterial transformation method. With a plasmid inside the bacteria, you can a) use bacteria to make copies of the plasmid, b) make new proteins with the transformed bacteria and c) do the same inside mammalian cells using the Calcium Phosphate transient transfection method that we developed earlier. With molecular cloning techniques, we can control biology and make cells do some really cool stuff! Note: this is an overview post and does not have a step-by-step protocol associated with it. I’ll tease apart the different steps in future blog posts.
Note: If you’re writing research papers, I highly recommend Grammarly – it’s a free grammar check plugin for Chrome. Try it out here…
Molecular Cloning of Plasmids: Primer Design
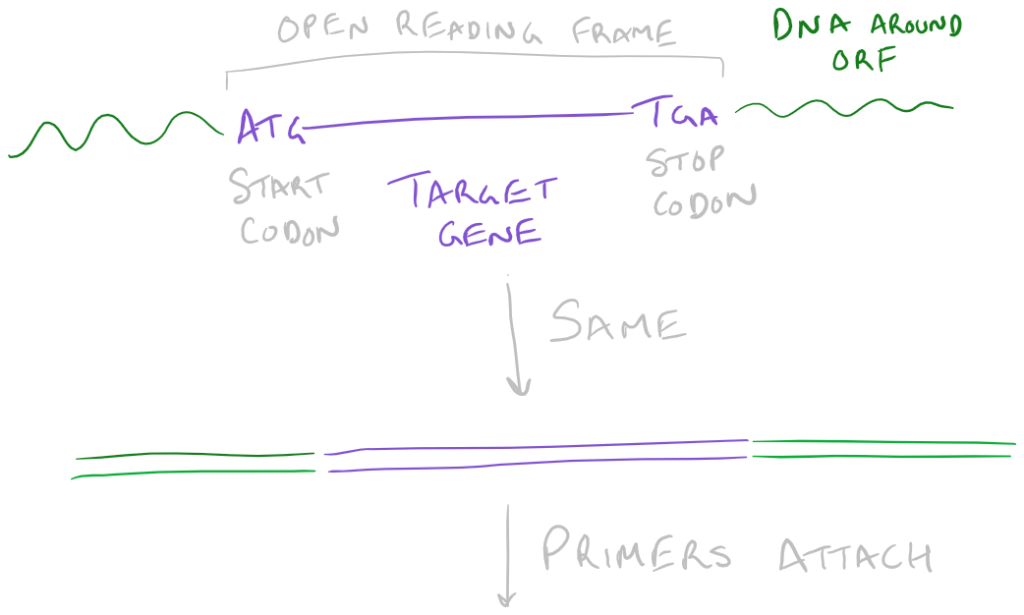
“Cloning” refers to the process of making a copy of a gene so that we can modify it and see what happens. Remember, if you modify genes, your cells start producing new proteins; these proteins could be therapeutic and/or give your cells some new skills. To start, you’ll probably want to review the PCR protocol & guide to remember how PCR works. Now, let’s say we have a gene that we want to clone already available. The next most important part of PCR based gene cloning is the primer…so to design a primer, we need the following:
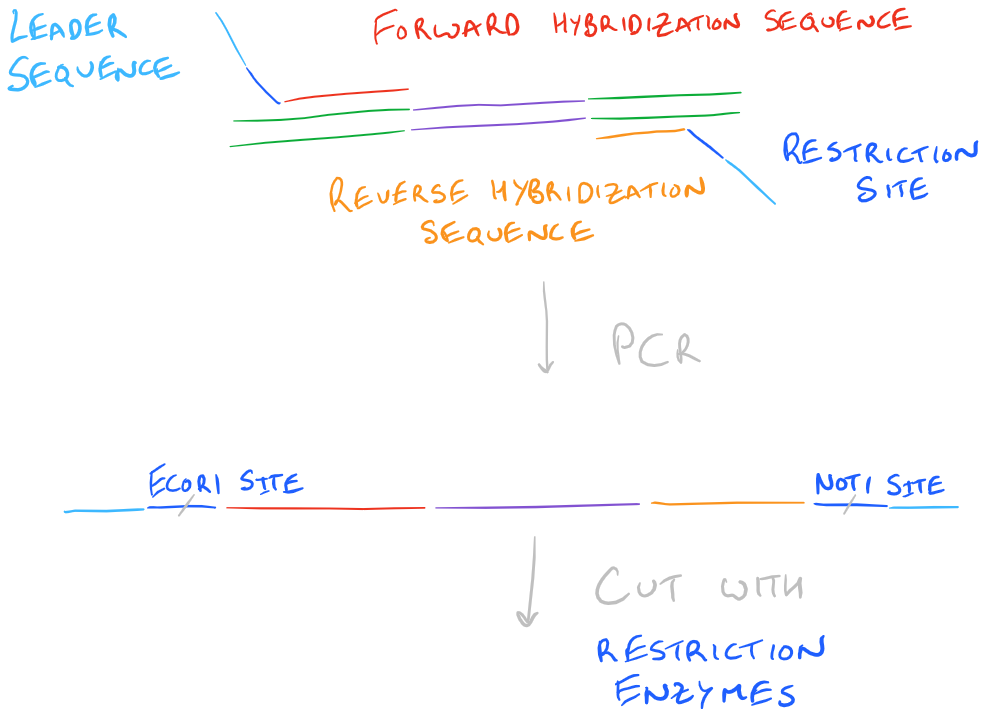
- Hybridization sequence: A series of bases that compliment the bases right before your “target gene” or gene of interest.
- Leader sequence: A few extra bases for our restriction enzymes to make efficient cuts that don’t overlap with our gene of interest.
- Restriction sites: Places that we will cut so that we can make the plasmid circular.
Take a look at this image to understand the above plasmid design:

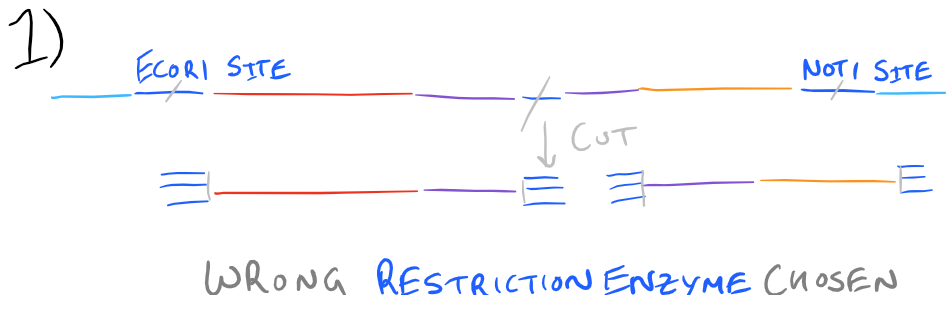
Be Careful Designing Plasmid Primers for Gene Cloning
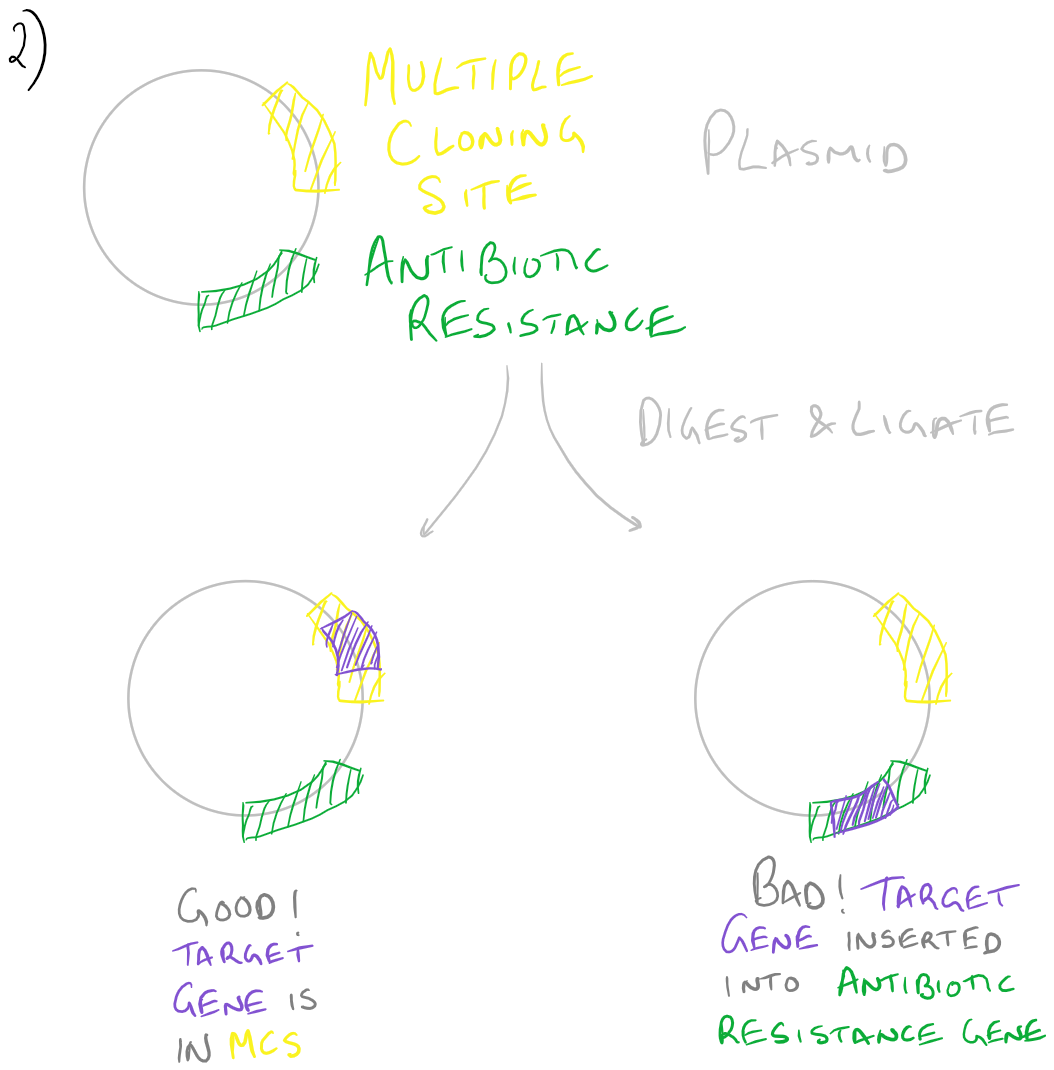
Based on the above image, you can tell that if an enzyme’s restriction site is inside your gene of interest, you cannot use that restriction enzyme because you’ll cut your gene. Also, you’ll be putting this gene into a new plasmid. Make sure that the restriction enzyme you use is compatible with the “multiple cloning site” within this new plasmid. If you end up inserting this gene in random locations, the probability that this plasmid will be incorporated into the bacteria or expanded will be significantly decreased.
Look at the image below to understand these tips:
Gene cloning with PCR
With the primer already designed, we are ready to clone our gene. The rest of the steps in the gene cloning process are:
- PCR everything
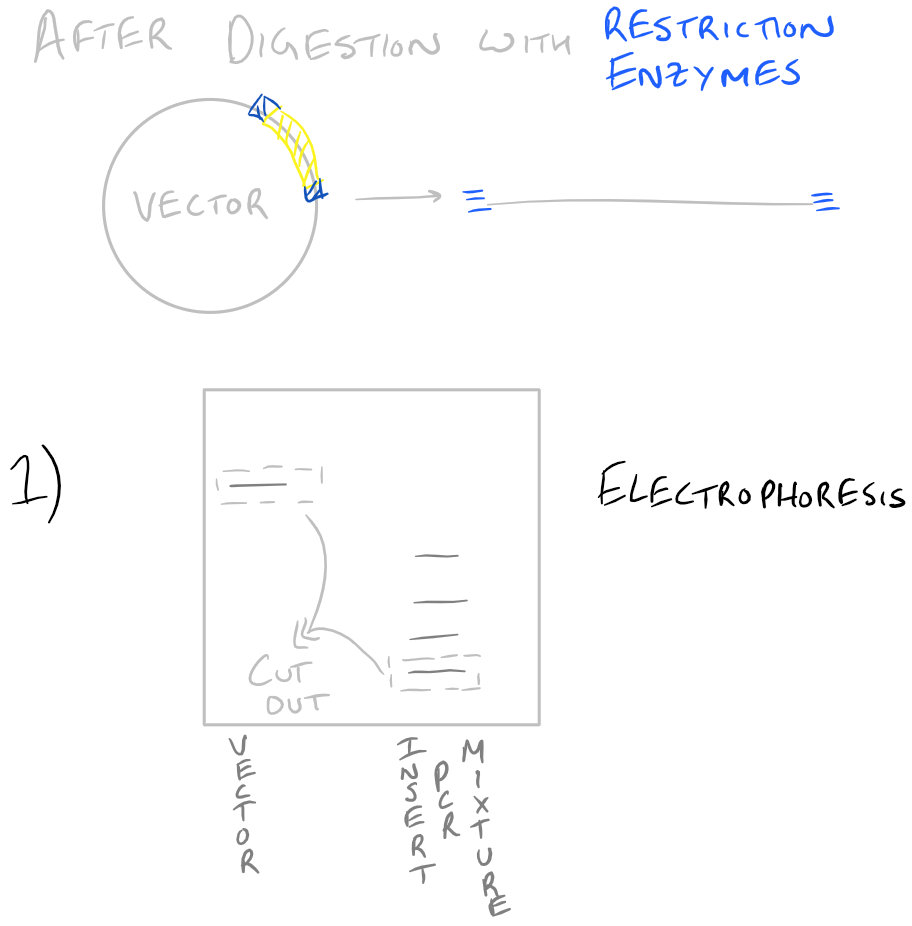
- Use restriction enzymes to digest the PCR product
- Use Gel Electrophoresis to purify the insert and the “vector” (recipient plasmid)
- Ligate the plasmid
- Transform bacterial cells
- Isolate our plasmid for future use
- Analyze the PCR products
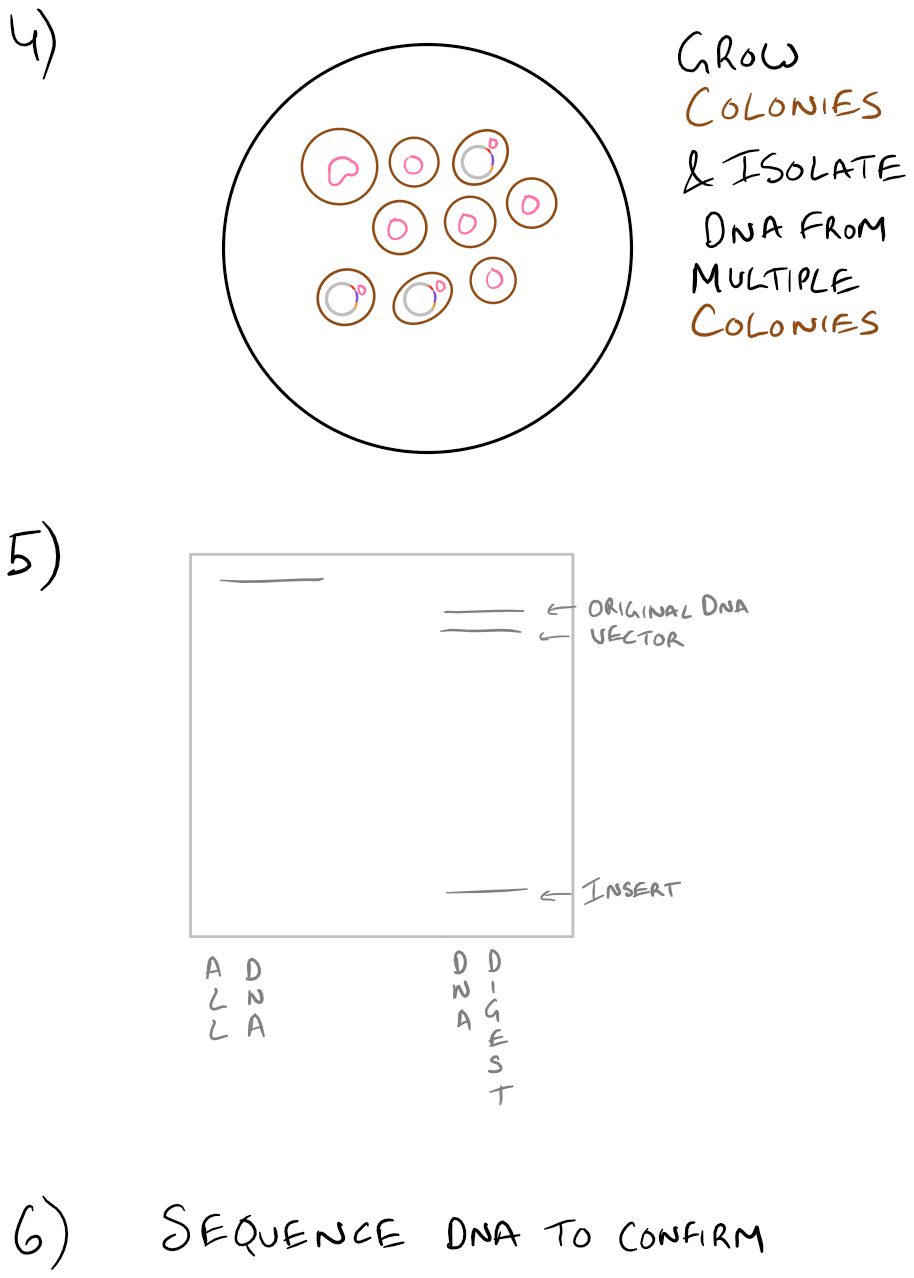
Since we already know how to do PCR from our previous blog post, let’s focus on the other stuff. The first step listed is to digest the PCR product. For this, we will use restriction enzymes and incubate them with the PCR products. If everything was designed properly, we would know exactly where the restriction enzymes will cut the DNA in both the “vector” and the “insert”. Next, we will run these restriction digests on a gel and pick out the bands corresponding to our vector and insert (which we already know the size of). Any other “junk” PCR products will be removed in this step. The vector and insert DNA will then be “ligated” to form our new plasmid. To confirm our gene is in this plasmid, we will transform some bacteria with it on a petri dish. Try to make dilutions of your bacteria so that you can grow colonies of bacteria and pick out colonies later on. With the colonies that you pick out, you’ll want to isolate their DNA and digest it to see if your vector and insert are inside. We’ve already isolated the vector and insert in the past, so it’s simple to find out if our insert is inside the bacteria. Finally, as another confirmation, we will sequence the DNA from the bacteria and confirm that everything exists. We will write more about each of these steps in the future, but we wanted you to see them together, as an overview, in this blog post.
Take a look at the steps below:

Note: Grammarly is a free grammar check plugin for Chrome. I used it for this article and really like it! Try it out here…
Tips and Tricks with this methodology
PCR
: Make sure you choose the melting temperature to match the part of the primer that binds the “open reading frame” (your gene of interest). If you choose the wrong melting temperature, you might get the wrong PCR products because either a) your Tm was too low and you didn’t split the ORF or b) your temp was too high and you got lots of non specific binding.
DNA Digestion
: Make sure DNA digestion occurs for a long time, preferable overnight, to make sure all your vector and insert products were cut and maximize your ligation in the next step. You may need to use alkaline phosphatase in this step. I’ll speak more about that in the future.
Gel electrophoresis
: During gel electrophoresis make sure that you run the correct controls and *know* what wells relate to each of the digested products. Also, make sure you skip lanes to make cutting the wells easier. After this, you’ll need to quantify your DNA so you have enough for the ligation step. You can use a UV spectrometer for this step.
Ligation
: Ligation also requires you to have several controls. For example, you need a ligation reaction without any insert. This will tell you how much background self-ligation your recipient plasmid has. You also need a ligation with some of the other bands you see during your gel electrophoresis. This will tell you how much contaminant DNA there was in your ligation.
Methods related to Gene Cloning on SciGine
- Cloning of Rabbit Eye RNA using cDNA library
- Detection of positive Yeast transformants
- Use of a Ligation Free Cloning Kit
- PCR Cloning, Amplification, Sequencing of cDNA
- Gene Cloning of the RAPD loci
Video about Gene Cloning with Plasmids
Notes from our audience
- “TA cloning is another approach if cloning doesn’t work in systematic way” –Swapnil Oke on Linked In
- “I think for completeness I think it would be valuable to also mention a few other plasmid features that are important. I didn’t see mention of ribosomal binding sites (RBS) or origin of replication, etc” – Michael Kim on Linked In. — I plan on write about more details regarding plasmid design and purification in the future. For now, please don’t use the above blog post as a comprehensive guide…more like an overview 🙂
References
Molecular Cloning book about PCR based cloning
Addgene Plasmid Reference, a comprehensive guide
Chaokun et al., Fast Cloning
[…] our previous blog posts we have explored Gene cloning with Plasmid Vectors in Bacteria, Transient transfection into Mammalian Cells with Calcium Phosphate, and how we can use newly […]
[…] have already discussed a high level view of gene cloning in our Molecular Cloning Guide blog post. However, in that blog post we didn’t delve very deep into how we can perform each […]