
Immunofluorescence Microscopy Overview & Theory
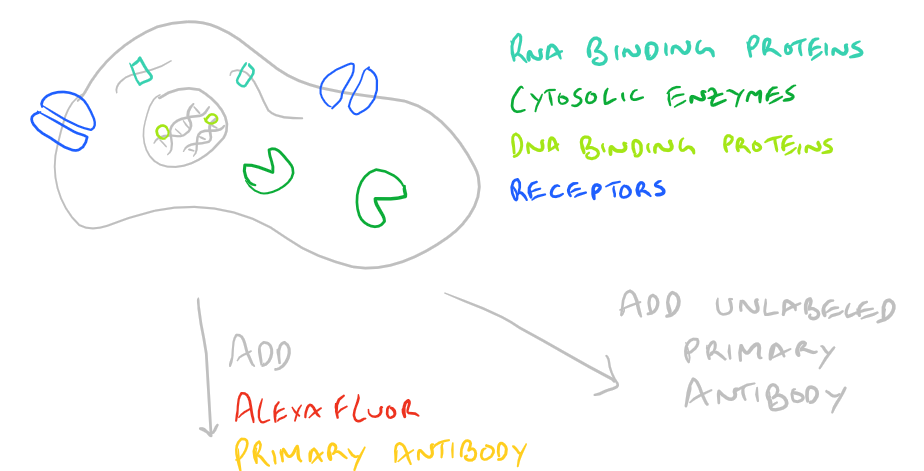
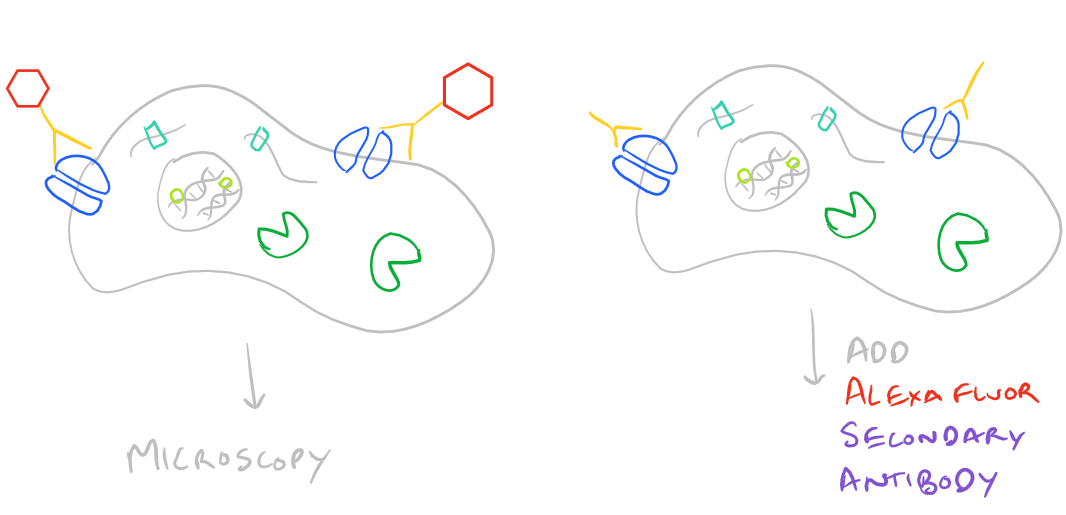
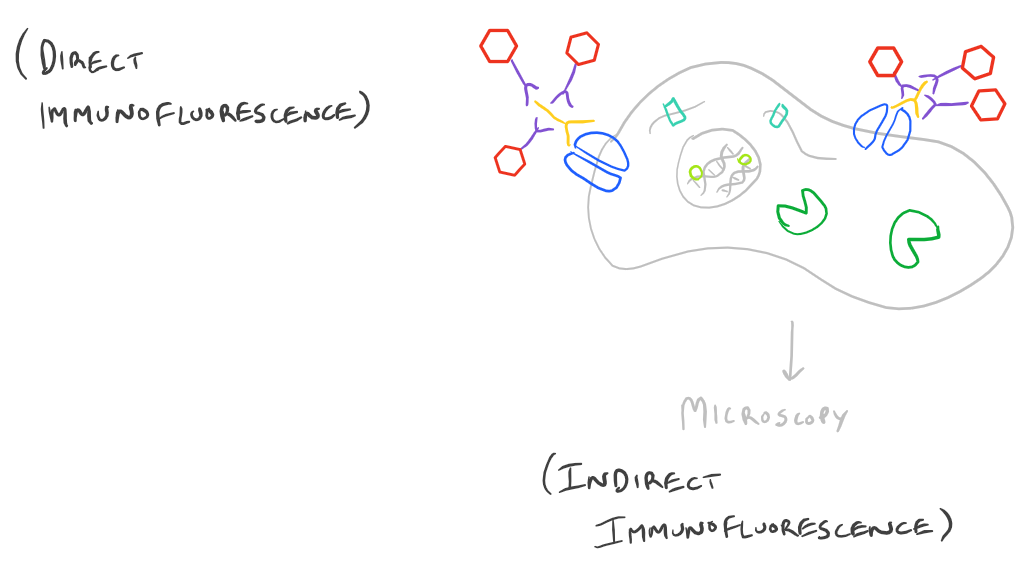
Immunofluorescence Microscopy (IF) is a classical technique to observe the localization of molecules in cell/tissue sections. While most researchers try to look for proteins, it is also possible to look for DNA, RNA, and carbohydrates in sections of tissue. With the addition of this technique to your tool belt along with the immunoprecipitation scientific method and the western blot scientific method, you will now have a variety of different ways of manipulating and analyzing biomolecules from tissues, cells, and cell lysates. The principle is fairly straight forward: incubate your sample with an antibody generated towards your target molecule and then detect the antibody using fluorescence. In an immunofluorescence microscopy experiment, this takes the form of putting your cells on a microscope slide, probing with antibodies, and then using specialized fluorescence microscopes with red/blue/green filters along with specific laser emitters to visualize the antibodies. As you would expect, you could either incubate your samples with a antibody-fluorophore conjugate and visualize it (direct immunofluorescence), or you could first put in an antibody that recognizes your target and then put in a secondary antibody-fluorophore conjugate that recognizes the first antibody (indirect immunofluorescence).
Related articles:
- How does protein labeling with fluorescent probes work?
Here’s an image which describes the above theory:
Advantages and Disadvantages of Direct vs. Indirect Immunofluorescence Microscopy
The most common method of performing an IF experiment is to use the indirect immunofluorescence technique. But both methods have their merits, and depending on your application, you may be limited to one method over another.
Direct Immunofluorescence microscopy:
Advantages
Fewer steps: You don’t need to use a secondary antibody, so you have fewer wash and other steps.
Fewer Complications: Fewer steps also means less troubleshooting.
Disadvantages
More expensive: Primary antibodies that are specific and also conjugated to fluorophores are hard to find and expensive.
Lower overall signal: Each primary antibody only has one fluorophore, so you have lower overall signal.
Indirect Immunofluorescence microscopy:
Advantages
Higher signal: A single primary antibody may bind to multiple secondary antibodies (which each have a fluorophore)–so you get higher overall signal because of this amplification effect.
More versatile: Multiple types of secondary antibodies may be used to detect a single primary antibody. This allows you to probe the same sample multiple times, get higher signal, use a single secondary to detect multiple primaries, and various other strategies.
Cheaper: Secondary antibodies raised against a certain species of primary are very cheap and widely available.
Disadvantages
More steps: With a secondary antibody incubation step, there is a possibility for more complications and troubleshooting.
Dealing with the weaknesses of Fluorophores in Immunofluorescence Microscopy
[Slightly technical] Fluorescence is a phenomenon whereby an electron receives some light energy, gets temporarily promoted to a higher energy orbital, and then relaxes back down to its baseline energy state. As the electron relaxes, it releases the light at a slightly lower energy that the initial incident light which hit it. [End Technical Section]
How Fluorescence works:

This leads to some challenges when performing IF experiments: photobleaching, autofluorescence, and non-specific fluorescence.
Photobleaching during Immunofluorescence Microscopy and how to deal with it:
Use less energy: Some fluorophores will decompose after receiving a lot of energy from lasers. This is typically seen in microscopy when your sample slowly become dimmer and dimmer after imaging a section too long. To overcome this challenge you should use a lower energy intensity when looking around for the right locations in your sample, and then switch to a higher energy intensity when taking an image of your sample. Typically, good microscopy systems will take care of this automatically.
Antifade agents: these molecules scavenge singlet oxygen radicals that are caused by high energy lasers and can be used to maintain high fluorescence signals during microscopy. It is theorized that singlet oxygen species are the main culprit that cause localized damage to fluorophores.
High yield fluorophores: With fewer high-yield fluorophores you can get more signal. The “quantum yield” is an important number when considering which fluorophore you should use alongside your antibodies. If you can find quantum-dot conjugated antibodies, you’re going to be amazed with your microscope images! 🙂 I’ll write more about them in the future.
Cellular Autofluorescence:
There are a few molecules within cells that cause auto-fluorescence. Auto-fluorescence can lead to false positive data in flow cytometry experiments and rarely even in immunofluorescence microscopy. Be wary of the following molecules:
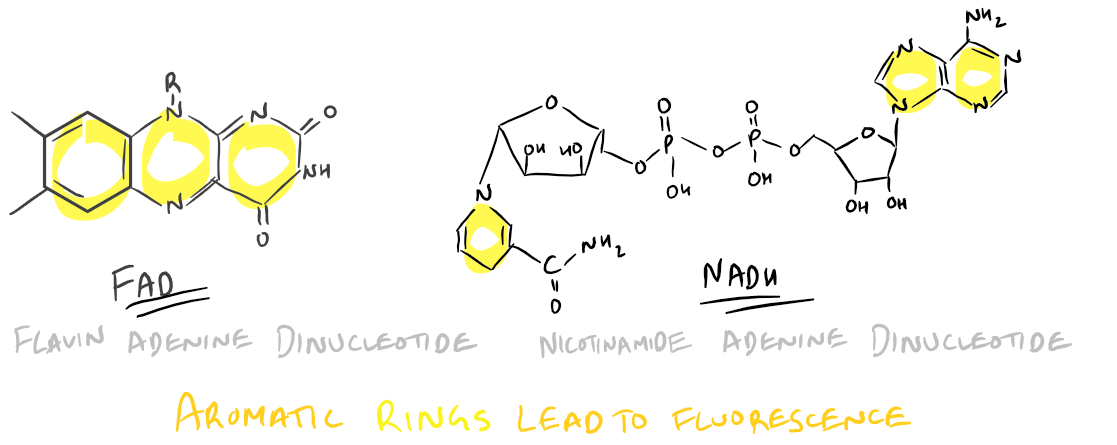
- FAD and/or FMN: Flavinoids such as these have an Excitation @ 450 nm and Emission @ 515 nm
- NADH: An Adenine dinucleotide with Excitation @ 340 nm and Emission @ 560 nm
FAD and NADH structures lead to auto-fluorescence:
To avoid autofluorescence, use fluorophores with excitations and emissions far away from the above wavelengths so that the inherent fluorescence in your sample doesn’t affect your measured signal.
Non-specific Fluorescence:
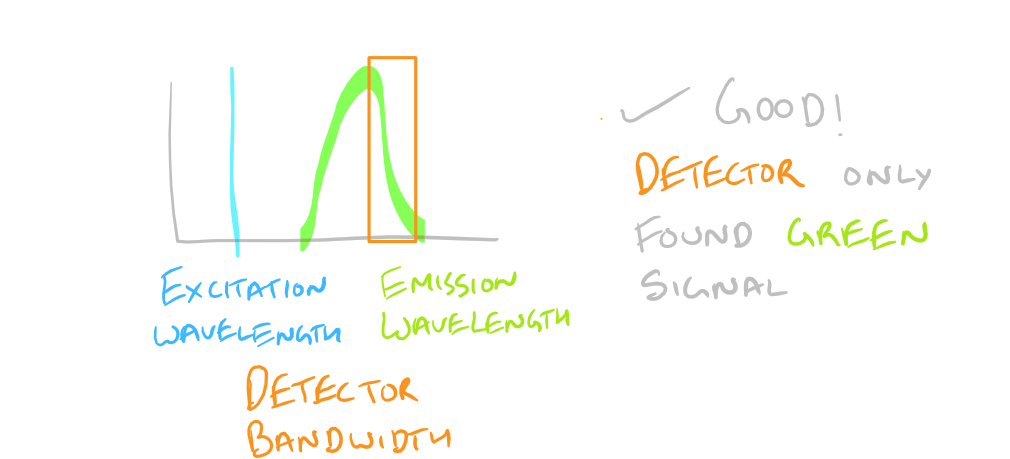
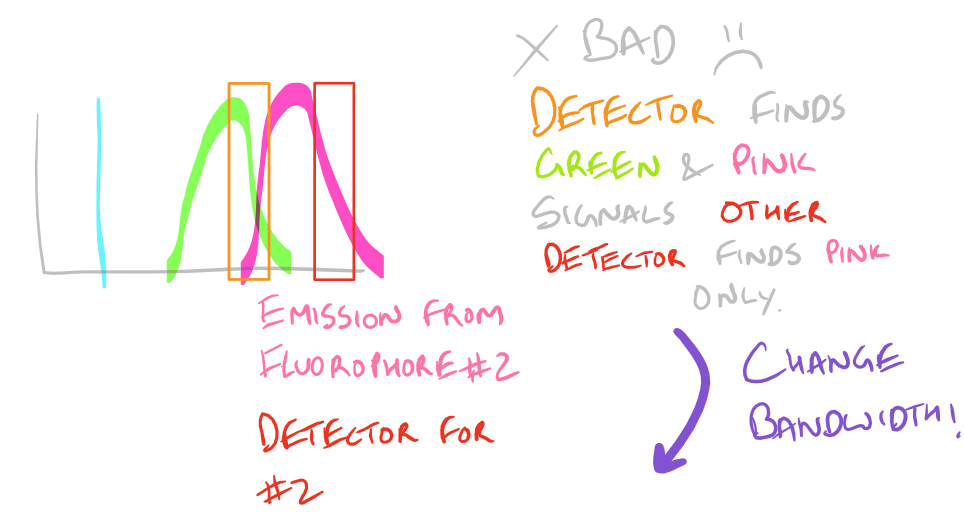
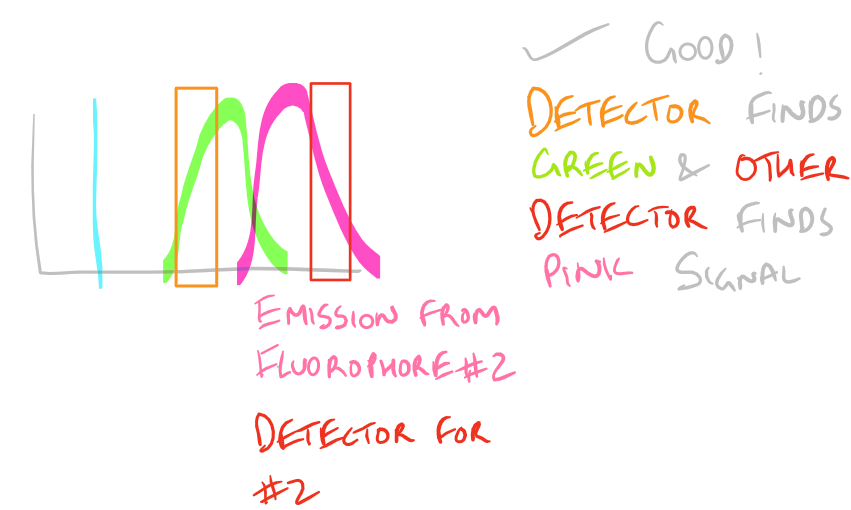
Based on the excitation and emission of different fluorophores it is possible for you to get fluorescence signals even though you haven’t probed for them. Be wary of the different fluorophores that you use in your sample and the bandwidths with which you detect them. You may need to modify your microscope’s settings and filters to get really sharp and beautiful IF images.
To avoid non-specific fluorescence, consult a fluorophore chart as mentioned in the guide for the Flow Cytometry (FACS) scientific method.
Why do we have non-specific fluorescence? Take a look at this image:
Note: Grammarly is a free grammar check plugin for Chrome. I used it for this article and really like it! Try it out here…
Immunofluorescence Microscopy Step-By-Step Guide
Example Immunofluorescence of Pancreatic Sections
This protocol describes the detection of insulin in paraffin wax-embedded sections of pancreatic tissue.
Materials
Normal donkey serum (#D9663 Sigma)
Guinea pig anti-insulin antibody (used at 1:3200; #ab7842 Abcam)
Biotinylated donkey anti-guinea pig antibody (use at 10 µg/ml; ##706-066-148)
Streptavidin conjugated Cy3 (use at 1:100; #016-160-084 Jackson Laboratories)
Proteinase K buffer (50 mM Tris pH 8.3, 3 mM CaCl2, 50% glycerol)
Proteinase K (20 mg/ml; #AM2548 ThermoFisher Scientific)
DAPI (#D1306 ThermoFisher Scientific)
SlowFade mounting media (#S36937 ThermoFisher Scientific)
Experimental procedure:
- Cut 8 µm paraffin sections at the microtome and mount onto glass slides.
- Heat slides at 60°C for at least 5 min to melt wax.
- Dewax slides in xylene for 2x 5min*, 100% ethanol for 2x 5min and immerse in running deionised water until clear.
- Circle sections using a wax stick to easily observe staining area in subsequent steps.
- Prepare Proteinase K by adding 1 µl to 1 ml warm (37°C) Proteinase K buffer. Perform antigen retrieval by adding 50 µl of diluted Proteinase K per section in a humidity chamber for 20 min at 37°C*. Wash slides 3x 5 min in PBS with stirring.
- Block sections with 50 µl of 10% normal donkey serum in PBS at room temperature for 30 min in humidity chamber.
- Tip off blocking solution and add 50 µl anti-insulin primary antibody diluted in 10% normal donkey serum in PBS. Incubate overnight at room temperature in humidity chamber.
- Wash slides 3x 5 min in PBS with stirring. Add 50 µl anti-guinea pig biotinylated secondary antibody diluted in 10% normal donkey serum in PBS. Incubate 2 h at room temperature in humidity chamber.
- Wash slides 3x 5 min in PBS with stirring. Add 50 µl streptavidin-Cy3 diluted in 10% normal donkey serum in PBS. Incubate 1 h at room temperature in humidity chamber in the dark.*
- Wash slides 3x 5 min in PBS with stirring. Add 50 µl DAPI (3 µM) diluted in 10% normal donkey serum in PBS to stain cell nuclei. Incubate 30 min at room temperature in humidity chamber.
- Tip off excess solution from slide and mount in one drop of mounting medium with coverslip.
- Examine at the fluorescence microscope*.
Procedural notes
- Step 3. Perform in fume hood
- Step 5. Perform incubations in humidity chamber to reduce evaporation of antibody/proteinase solutions
- Step 9. Perform incubations with fluorescently labelled reagents in the dark
- Step 12. Slides can be stored at 4°C until use
- Consider buying “pre-adsorbed” secondary antibodies. These antibodies have been incubated with common cross-reacting species and they didn’t bind. Therefore, they are super specific to your species of choice and should provide very little background signal.
SciGine Immunoprecipitation Microscopy Protocols and Methods
Immunofluorescence of Arp3
Immunofluorescence Microscopy for MUC of Methanol Fixed Tissue
Use of Cy3 conjugated antibody for Immunofluorescence in Cos7 cells
Cells permeabilized with TritonX-100 for use in Immunofluorescence Microscopy
Analysis of Epithelial Polarization using Indirect-IF
References:
Discussion of Immunofluorescence by Robinson et al.
Robertson et al. IF guide on Biomed Central
NADH and FAD autofluorescence